How to create a scouting report
Hello and welcome to another edition of the D-Line Examples newsletter. My name is Craig, and each week I humbly tackle reader questions about how to coach and play defensive line. Send me your questions and in return, I’ll offer actionable real-world advice.
How to create a scouting report
What information would you give to your guys about the opposing offensive line besides what they would read on a standard hit chart?
Over my years playing pro and collegiate football I’ve realized that when you have great athletes on both sides of the ball what separates the good from the great teams is the preparation that happens before the game.
But what information is most helpful? I’ve been on teams that give way way too much information and others that give way too little, but what exactly is the right balance?
That’s why for D-Line Examples #066 I’ll be sharing my personal formula for putting together a D-Line scouting template so you can give your D-Line the exact right amount of information they need to play fast.
The template
I’ve seen quite a few scouting reports, so I decided to create my own that encapsulates all the parts that I think are most necessary. You can check it out the full template here. Feel free to make a copy of it for your D-Line!
So this report includes 3 kinds of information…
Type
Tells
Tendencies
I’ll go through each of these in more detail below, but the goal of any good scouting report is to distill large chunks of information about your opponent into digestible bites.
That’s why I’ve kept this report short, sweet and digestible. Let’s take a look how to fill it out.
Tendencies
Every offense has pre-snap indicators like down and distance, personnel, formation, field position and game situation that indicate whether it’s run or pass and what play they are going to run.
You as the coach though have to make this information digestible so your guys aren’t bogged down by too much information.
So your process should look something like this…
Step 1: Create the report
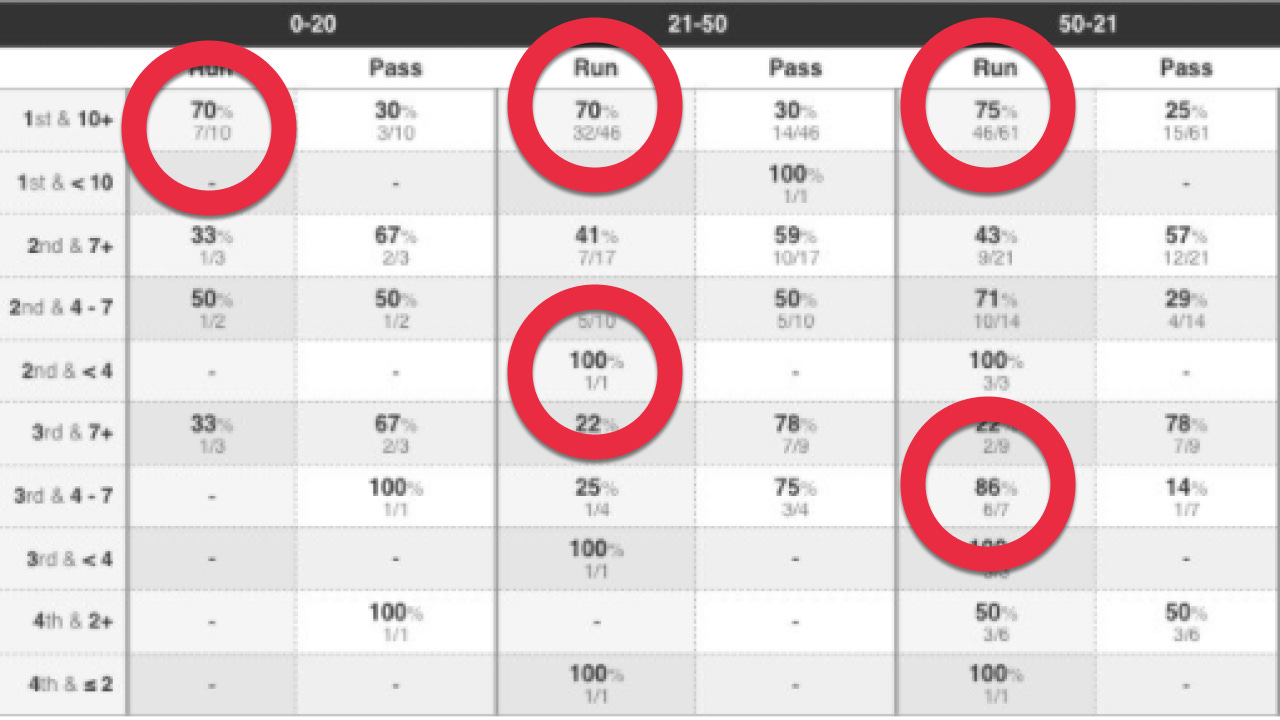
First, you’ll need to do the leg work of creating reports that look at run and pass tendencies of your opponent’s last three games through the lens of down & distance, personnel, formation, field position and game situation.
Here’s an example of one that looks at pass and run tendencies by field positions and down and distance…
Step 2: Surface tendencies
Once you’ve built the report then circle any areas that have a 70% or greater tendency. These are gold and give your D-Line clear indications if the offense is running or passing.
Step 3: Distill tendencies
As you create more reports looking at run pass & play tendencies jot the strongest ones down in a tips and tendencies sheet (seen below).
Note: Don’t include more than 10 bullet points in this sheet. It’s best to to keep the list short so your D-Line can remember it.
Step 4: Give instruction around the tendency
The ultimate goal of creating a list of tendencies is to give your D-Line an edge over their opponent.
So give them practical applications of what they can do when they identify the tendencies.
For example, if you know that 2nd and 10 is draw tell your D-Line to use their power rush so they can be closer to making the play (seen below).
Type
Next your D-Line needs to put their pass rush plan together and to do that they need to know what type of blocker they’re going against.
So watch 3 games worth of film and study each blocker’s hand type, aiming point and set.
Hand type
To identify hand type you’re going to want to look at the path and speed with which a blocker’s hands travel.
This is actually simpler than you would think because there are only 2 hand types. The puncher and grabber.
Puncher
These guys will shoot their inside hand, outside hand, or both hands directly at their target with violence.
Grabber
These guys will wait for you to make the first move and then loop their hands outside at their target.
Aiming point
Next, identify where the blocker aims his punch. Generally, blockers will aim at the chest, shoulders, belly or a mix of the 3 (seen below).
Set
And lastly the 3 types of sets are the angle, jump and vertical set.
Angle set
This type is the most common. Your opponent will come out on an angle to meet you on your rush path.
Jump set
This type of set is used as a change up to surprise you. Your opponent wants to get his hands on you right now and stop you at the line of scrimmage.
Vertical set
This type is for extremely patient blockers. Your opponent will set straight back and wait on you to throw the first move.
Distill information into scouting report
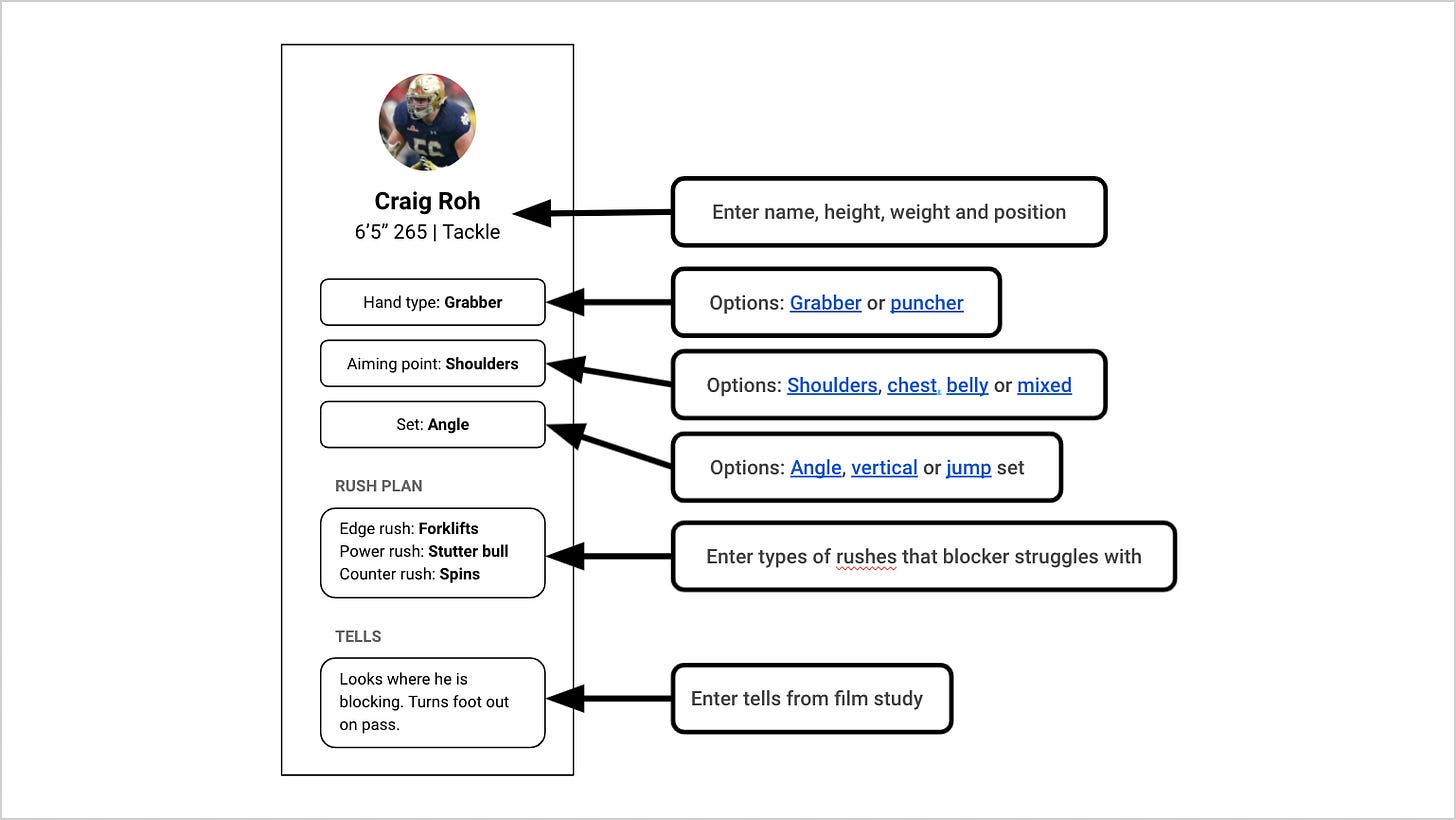
Once you’ve watched 3 games worth of film for every blocker, fill out the scouting template with the hand type, aiming point and set for each blocker (example below).
This information will help your D-Line to plan what rushes will be most effective against their opponents.
Furthermore, as you’re watching film, you’ll likely see rushes that the offensive line struggles with. Put these in the rush plan section as suggestions for you defensive line.
Tells
Lastly, the icing to any scouting report is the tells. Tells are pre-snap mannerisms your D-Line can use to identify whether it’s pass or run.
Some examples of these are light stances (usually pass), staring at assignment (blocks where they are looking) and large splits (usually pass).
You don’t want to add one off “tells” to your scouting report so if you think you have one, write it down and see if it comes up in film consistently. So once you have a tell you’re confident about, simply add it to the bottom of your scouting report.
Well, that’s all for this week folks. If you have any questions please reach out and hope you have an amazing week!
And whenever you are ready, there are 2 ways I can help you:
Learn how to develop top tier pass rushers and a lethal pass rush attack here (1,000+ students)
Learn how to turn your D-Line into a block destruction machine here (1,100+ students)
-Craig


Good stuff!
Great process! Love the approach to distilling and simplifying information for the players, this is so important! Thanks for sharing coach!